Here are two scans of the Jobo Color Star 3000 manuals that I have.

Here are two scans of the Jobo Color Star 3000 manuals that I have.
I’ve been sporadically using the Sigma 35mm f/1.4 DG since March. I find that I generally like the rendering of the lens, but the auto focus leaves a lot to be desired. I’ve found that at closer distances I need stick to the center AF point, and even then it doesn’t nail the focus as well as my nikon lenses. When it does it’s very nice. When it misses, well there’s yet another lost image. Those lost images add up to a lot of frustration. Luckily I’m not trying to make a living with this lens. My solution has been to stop down and shoot at f/5.6 to f/8 if I’m just using it as a walk around lens. Not optimal, and certainly not taking advantage of the fast f/1.4 aperture.
I place an order for the Sigma USB Dock when it was announced. It finally arrived last week.
Opening the dock was uneventful. It comes with the dock, a body cap installed on the dock, a USB cable, minimal instruction manual and a warranty card.
The instructions do provide you with a link to download the application, but I missed it the first time looking though the sheet. I eventually found it with a search, but in here it is in case you are looking too: http://www.sigma-global.com/download.
Once installed on my mac the software found the dock without issue. Mounting the dock to the lens was not as smooth. When I first tried I followed the alignment marks on the dock and the lens, but the dock didn’t want to turn. I looked it over a few more times and eventually concluded it must just be tight, so I applied a bit more pressure. It mounted, but it was far from smooth. Not a great first impression. After taking it on and off, which is something you will need to do often to calibrate the lens, it is now much smoother.
The software immediately recognized the lens and offered to load the latest firmware onto it. This completed in a few minutes.
Sigma doesn’t provide written documentation that I have found. However they do have a basic overview video at http://vimeo.com/64665246.
The Sigma 35mm DG is a pretty simple lens and doesn’t have some of the modes the other lenses have such as focus limiters or image stabilization. So the options of what the Dock can set are limited.
Pressing the Customize button you have only one choice, which is the Focus Setting button. This brings you into the focus setting screen where you can configure how the lens focuses at each of four different distance ranges.
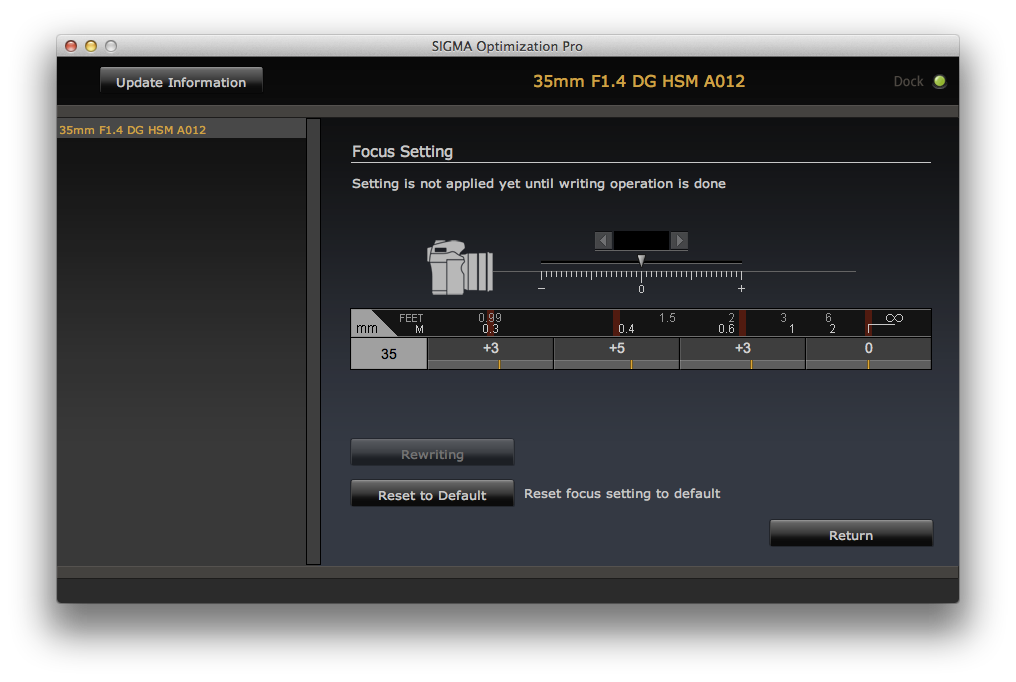
I haven’t found clear instructions on how best to determine the correct values. I wish the video had covered that a bit. But with a whole lot of trial and error I was able to get the values determined for my lens, which are shown in the image.
I basically set the focus at the distance shown on the chart and positioned a high contrast target so it was in focus at the point. Then I pressed the AF-ON button and took a picture. If it wasn’t sharp I used LiveView to get a feel for which way the lens needed to be turned to achieve focus. I then tried an adjustment. I frequently overshot and need to redo each position several times. This took me about an hour. Remember each adjustment requires you to take the lens off the camera and mount it to the dock. Then you navigate through the software to get back to the Focus Setting page. If I had a zoom lens I can see being very frustrated by having to adjust 16 different zones.
Well it’s only been a few days, and I haven’t taken the system out for a real trial run. But I have made lots of tests around the house.
The first thing I noticed is I can now use the side AutoFocus points and they seem as accurate as the center. I suspect this is a result of the firmware, but I didn’t think to do a before and after test.
The lens is also much more accurate in the closer distances. I can shoot with confidence wide open, which is really nice since the image is so good wide open with this lens. I’ve had to resort to Live View in the past to get accurate focus in the past.
I’ll be testing things out more over the rest of the summer. But it looks like the $59 fixed up my lens. I’m still a bit annoyed that it wasn’t perfect out of the box, but in the end I suspect that I’ve got a better match for my camera than if I had sent just the lens back to Sigma for a new firmware and calibration.
I think this process will get old quickly with a zoom lens or two. If Sigma just put a USB port directly on the lens I can see this being much easier as you could avoid taking the lens off the camera each time.
I have been printing with the condenser head on my Durst 138S. I use Ilford multigrade filters in the filter drawer for contrast control. I like the sharpness of the grain that the condensers give, and there’s something satisfying about sliding the correct condensers into the slots, due I think to their heft and how well built the machine is. But, and there’s always a ‘but’, when I want to make use of a dodge and burn mask I can’t. This is an inherent limitation of the condenser system which essentially focuses an image of the light source (bulb) through the negative and into the center of the enlarger lens. This collimated light is what’s responsible for the perceived sharpness of the prints. But it means that adding a diffusion layer as needed by the dodge / burn / pencil masks breaks the design.
I tried various methods of diffusing the existing light, but the results were wither too dim for large prints, or too uneven. So I decided to build my own light source. I had used white LEDs to make a simple head before, which worked pretty well. It was simply a bank of high power LEDs and a constant current controller which plugged into a timer. I thought about rebuilding this to fit the Durst. But given it’s a 5×7 enlarger I can’t find contrast filters large enough to fit above the negative, and I wanted to avoid under the lens filters (partially since the current set isn’t big enough to fit under the 210mm lens I have). I also enjoyed being able to set the contrast in finer steps than 1/2 a grade when I was using an Ilford 500 head on the 4×5 Omega.
So I’ve decided to build a variable contrast head. This will use two colors of LEDs; green for the soft grades; blue for the hard grades. By varying the intensity between them I should be able to produce any grade between the two extremes.
Parts have been ordered, and I’ve been playing with the LEDs and controllers. I’ll post some updates soon.
I added a new page on scanning black and white negatives with a DSLR. Scanning 35mm Black and White Negatives with the D800E
This also has a comparison of the D800E to a Canon Canoscan FS4000US and a ScanMate 5000 drum scanner. The results surprised me.
When I saw the early reviews for the Sigma 35mm f/1.4 DG lens I though it had a lot to offer me. 35mm is probably my favorite focal length for general photography. Reviews praise the lens for how sharp it is wide open. It also seems to have decent bokeh (out of focus rendering). I have been using a Rokinon 35mm f/1.4 lens on the D800E since I bought the camera last spring. I am really happy with the image quality of the Rokinon, but I have lots of trouble achieving perfect focus with it since it’s a manual focus lens and the D800E has a screen that’s not very good for manual focus. This really limits my use to the tripod and Live View focusing. So I ordered the Sigma, even though it was on back order.
Last Thursday it arrived. I quickly did some indoor focus tests and like all the other lens on this particular camera it seems I needed no Fine Tune focus adjustment. Cool. But my tests were done inside at close distances. We got some snow that evening and then is stopped midmorning Friday. I went out for a walk at lunch, despite the ugly gray sky. I brought a tripod to do a few tests to see if the lens was obviously decentered, and also just shot a lot of hand held shots around the village, since this is how I hope to use the lens much of the time. On Sunday I went to my brother’s house and shot a few pictures of his dog (and the rest of the family, but I won’t put them in this post), again hand held.
Upon review of the images I found some were perfectly in focus, and some were way off. I noticed the close up ones were good, and the more distant ones were soft. So I shot a lot of tests in the backyard and found that with the lens adjustment at 0 the auto focus was right on for close distances, but infinity was way off. I adjusted for infinity which requires a -11 for the Auto Focus Fine Tune. Close up shots are now noticeably soft. I’m not sure what to make of this. Sigma will be making a USB dock and software to adjust the focus points, so maybe this is the solution. But it’s not available now, and I don’t know when it’s coming out. It also seems crazy that we need to spend more money to make our lens work as it should. I haven’t decided if I should send it back to B&H and wait for another copy to come in, or send it to Sigma for repair.
Here’re a few examples:

Full image. Focus on hanging sign.

Focus point

Background that’s more in focus than focus point.
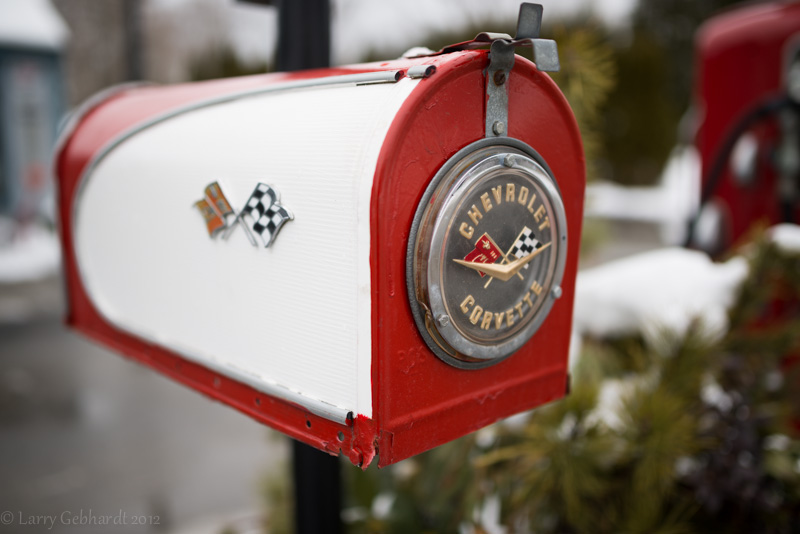
Full sized shot of mailbox. Take fairly close up. Focus point on red flag on front.
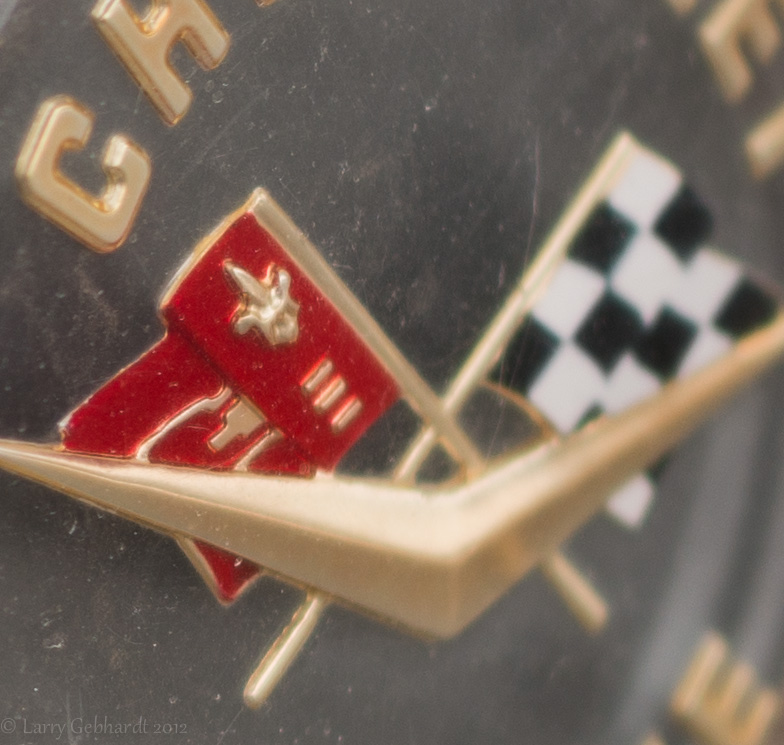
Focus point on red flag. I’d say it got pretty close.
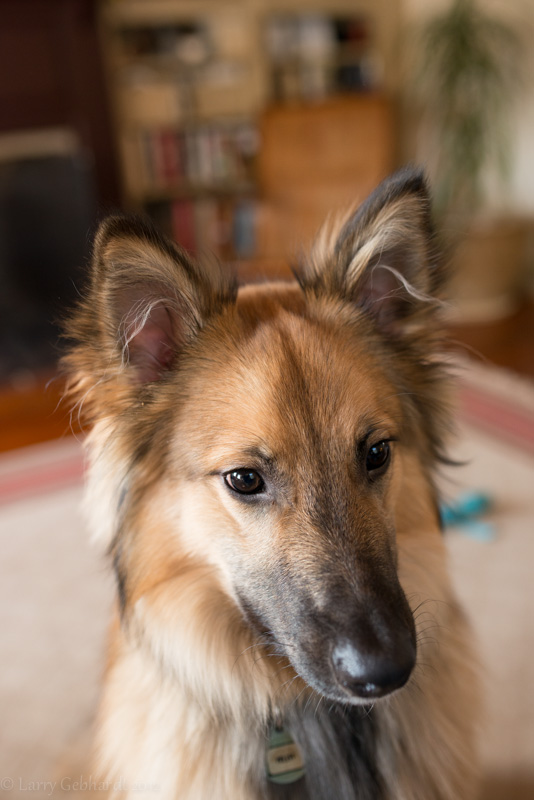
Close up shot with focus point on left eye. f/4
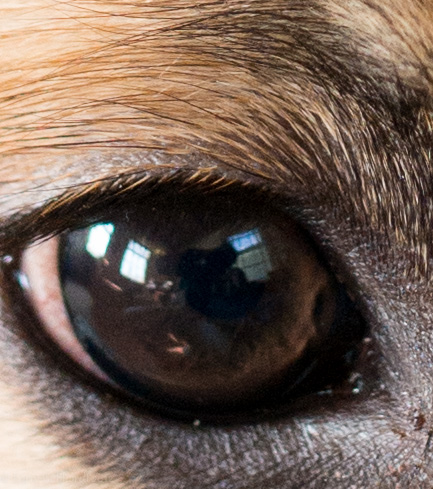
Left eye. Again the close up focus is good.
There are a few more shots over on my SmugMug gallery. Most are at f/1.4 to show the focus errors more clearly. There are a few shot stopped down. It’s pretty amazing how well corrected this lens is at wide apertures. Over all I am pretty happy with the image quality. It’ll certainly take many more shots to learn the lens. But sadly it doesn’t look like I can trust the Auto Focus, so is it really any better than my manual focus Rokinon?
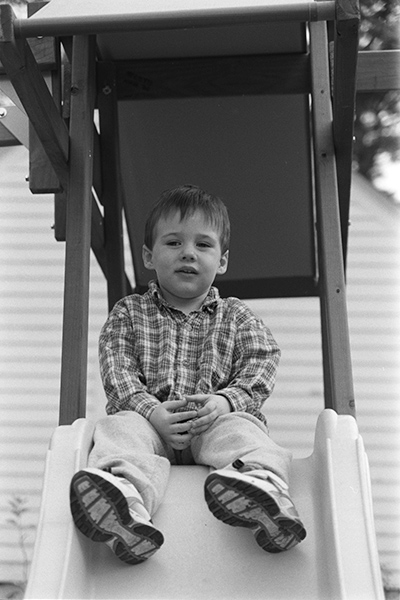
The full frame of my son, William, sitting on a slide. Delta 400 film shot on a Nikon N80. Unsure of the lens. Digitized with the D800E and Rodagon D 75mm f/4
I have many rolls of 35mm black and white negatives and color slides that I have never printed, and never scanned. I also have boxes of color negative film, but luckily we had lab prints of these. Even better most of these rolls have the prints with the negatives. Most of the 35mm film pictures are record type shots taken to remember an event, a look, or just because. The bulk of these are from the period right after when my kids were born up until I bought my first digital camera.
I’ve had a small darkroom for a while now in the spare bathroom, but I only printed a small fraction of the pictures I took, and then only the ones on black and white film.
I wanted a way to print the color slides I took, and I wasn’t prepared to start color printing in the darkroom at that time. So when the Canon FS4000US scanner came out in 2001 I bought one. It was a cheaper competitor to the Nikon scanners that I really wanted, but I could afford the Canon. The scanning was reportedly of the same quality, but it reportedly wasn’t built as well and lacked the ability to batch scan. I also think the film holders were not as good. Despite these negative points the experts all said it was an excellent scanner for home or light professional use. Combined with the new photo inkjet printers I was set. The quality at the time was very satisfactory. I could significantly crop and still make nice 8×10 prints.
For new film I scanned a few frames from each roll that I thought I might want to print or share online. But scanning a full roll took too much time with this setup. I still made contact prints of my black and white film in the darkroom, and continued to get lab prints from the color negatives. The slides got viewed and maybe a few scans were made. But mostly all the film sat in binders, to be tackled another day. Sadly only the lab prints got any significant viewing. There were also many rolls from before I got the scanner that I never went back through. Needless to say I have a whole lot of images I haven’t seen in the last decade, and most other people have never seen.
Fast forward 12 years. In that time I bought a digital camera, or 10, for the record type pictures and moved my art photos to a mixture of medium and large format cameras. I also have a fair number of record type pictures on medium format film as well. The digital images are easy to view, and I enjoy going back over them in Lightroom. Most aren’t technically great, but there’s enjoyment to be had watching my kids grow up again, or remembering a trip or just a simple hike.
Last summer I bought a PB-4 macro bellows for my Nikon D7000 to use for macro. The idea was only to get the movements of a view camera for flowers and such with the DSLR, since the bellows had limited tilt and shift capabilities. But it arrived with a slide copy attachment, which got me thinking. So I tried it with a 55mm AIS macro lens and some slides. The results were pretty good, at least in the center. About on par with the Canon scanner. But it was fast. About 15 minutes to scan a roll of 36, and I could probably go faster. I put it aside though because the quality on the edges made it difficult to justify the time to scan a bunch. But it really had potential.
Going through the contact prints and slides looking for a few images around Christmas last year I got to thinking how much I wanted all the old images moved into LightRoom as well. But the thought of scanning them on the FS4000US is not something I am looking forward to. As I see it I have a few options:
1) I could scan them on the FS4000US. I used to run the scanner on a Windows machine with a SCSI card. But my MacBook Pro doesn’t have a SCSI card. The scanner does however support USB1. The shipped software is incompatible with modern systems, but surprisingly with ViewScan the scanner is still fully functional on the latest Mac computers (and probably Windows). But with the USB1 interface each scan takes about 10 minutes. However Viewscan can be setup to automatically scan all the images in the holder. So 4 slides, or 6 negatives, at once can be done. I can do other things while the scanner does it’s thing.
2) I could buy a faster and better scanner for bulk scanning. I have looked at a few other scanners on the market, but none really look much better than what I have. A few will batch scan uncut rolls, but mine are all cut. I could buy a Nikon LS5000 with a slide feeder, but that only covers the slides and is expensive.
3) I could also send them out to be scanned, but that’s cost prohibitive and I don’t want my film sent over to India as the more affordable places do. But time is money, and ScanCafe seems to get decent reviews online. At least Ken Rockwell seems to like it. At $0.22 a scan that can add up fast. About $8 a roll, and I figure I have 400 rolls of film to scan.
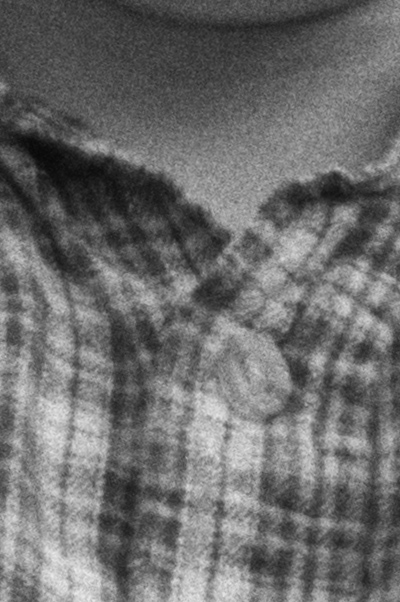
A crop of the above image. Delta 400 film shot on a Nikon N80. Unsure of the lens. Digitized with the D800E and Rodagon D 75mm f/4. No sharpening was applied (sharpening was set to 0). Simply inverted with a correction curve in Lightroom. Exported using Photoshop CS6.
When the negative is evaluated with a loupe it appears the scan captured almost all of the information on the frame.
4) Finally, I now have a Nikon D800E, and I’ve been playing around with the bellows setup again. I switched to using an enlarging lens instead of the Nikon macro lens since the sharpness was better. I further found out there are lenses designed for 1 to 1 copying. I just got a 75mm f/4 Rodagon D, and it’s incredibly sharp across the entire frame. I think this combination of a full frame camera and a lens optimized for 1 to 1 reproduction really works well.
I am going to see how fast I can get with the DSLR and the bellows. I know it does a good job with both the black and white film as well as the color slides. In fact the slides scan cleaner on the D800E than on the scanner. I haven’t compared it to my drum scanner, but at first glance they look to have less noise than that as well.
In a future post I will write up how I do the scanning. I hope to document the process for myself and others. I also plan on working out how to handle color negatives. I’m pretty sure they can be made to scan well with the DSLR. I also plan on scanning a reasonable sample size of the film I have to see if there are any issues, especially if trying to do it myself is penny wise and pound foolish.
And just for fun I’ll show the same negative scanned on the Canon FS4000US, the D800E, the ScanMate 5000 drum scanner, and even an old Epson 4870 flatbed.
Stay tuned…
I guess every blog needs a first post, so here we go. My name is Larry Gebhardt and I’m an avid, but amateur photographer. By trade I’m a software developer. This blog will contain a mix of things that interest me, mostly related to photography.
I work with both digital and film cameras. These range from cell phones, digital point and shoots, and high end digital SLRs and from toy film cameras up to 5×7 large format sheet film cameras. I also print both in the darkroom and by scanning and inkjet printing. I spend way to much time experimenting with equipment and processes and not enough time getting out and taking pictures. I’m hoping to write a bit on how I plan to pare down my overly broad collection of cameras. Maybe writing that here will force it to happen quicker.
I mainly consider myself a photographer of things. I like landscapes, cityscapes, macro, wildlife and nature photography. I also like street and portrait photos a lot too, but I don’t feel as comfortable shooting in those styles. I guess that’s a side effect to being inclined towards introversion.
I tend to ramble, so that’s probably enough for now.